

A deck with a pergola pairs a low-maintenance deck surface with an overhead structure for shade and definition. The best Canadian combinations match the pergola style (modern slat, timber, steel-and-cable, louvered or vine-covered) to your home, then run a moisture- and UV-stable board underneath, since a pergola keeps that zone shadier and damper.
Short answer: A deck with a pergola pairs a low-maintenance deck surface with an overhead structure for shade and definition. The best Canadian combinations match the pergola style (modern slat, timber, steel-and-cable, louvered or vine-covered) to your home, then run a moisture- and UV-stable deck board underneath, since a pergola keeps that zone shadier and damper.
A pergola is the single fastest way to turn a flat deck into an outdoor room. It frames the space, throws dappled shade across the hottest part of a Canadian summer afternoon, and gives you something to hang lights, a fan, or a climbing vine from. But a deck-and-pergola combination is also two structures that have to work together: the overhead design has to suit your house and survive snow load, and the boards underneath sit in more shade and trapped moisture than an open deck. We supply the decking that lives under these structures across the country, and the material you choose down there matters more than most homeowners expect.
This guide walks through 25 deck-with-pergola combinations grouped by style, then covers the decisions that actually determine whether the project looks right and lasts: attached versus freestanding, which way to orient it for shade, how to integrate lighting and heat, and the Canadian build realities — snow load, frost-depth footings, and permits — that a lot of inspiration galleries skip entirely. We don't build the structure for you, but we've watched enough of these go up to know where they go wrong.
Picture the deck you already have, or the one you're planning: a flat platform, open to the sky, baking by two in the afternoon. A pergola is what turns that platform into a place you actually want to sit. It's an open overhead structure of posts supporting beams and a series of cross-rafters (often called purlins). Unlike a roof or a solid-covered gazebo, a classic pergola is deliberately open between its slats — it filters light rather than blocking it, and it lets rain through. That openness is the point: you get shade and a sense of enclosure without making the deck feel like a dark, closed-in box.
Built over a deck, a pergola does four things at once:
Here's the trade-off we flag for every customer planning one — and the part this guide takes seriously. Everything a pergola does to the air above the deck changes the conditions for the boards below it. More shade plus less direct sun-drying means that zone stays damp longer after rain, dew, and snowmelt. Think of a Muskoka cottage deck under a slatted top: the morning after a summer storm, the open yard around it has dried by ten, but the strip under those rafters is still beaded with water at noon. That is exactly where the wrong decking material rots, cups, or grows mould, and where the right one quietly outlasts the pergola itself.
Before you fall for a single photo, start with how you'll use the space and which way your worst sun comes from — then pick the style that serves it. The 25 ideas below are grouped into the five pergola styles that dominate Canadian backyards in 2026. Each style has a distinct look, cost profile, and shade behaviour. We've shipped board into projects in all five, so read the group intro first, then choose the individual combinations that fit your lot, your house, and how you actually want to live out there. A west-facing Toronto deck that cooks at 60°C-plus by five o'clock has different needs than a shaded Vancouver lounge that mostly wants to stay dry.
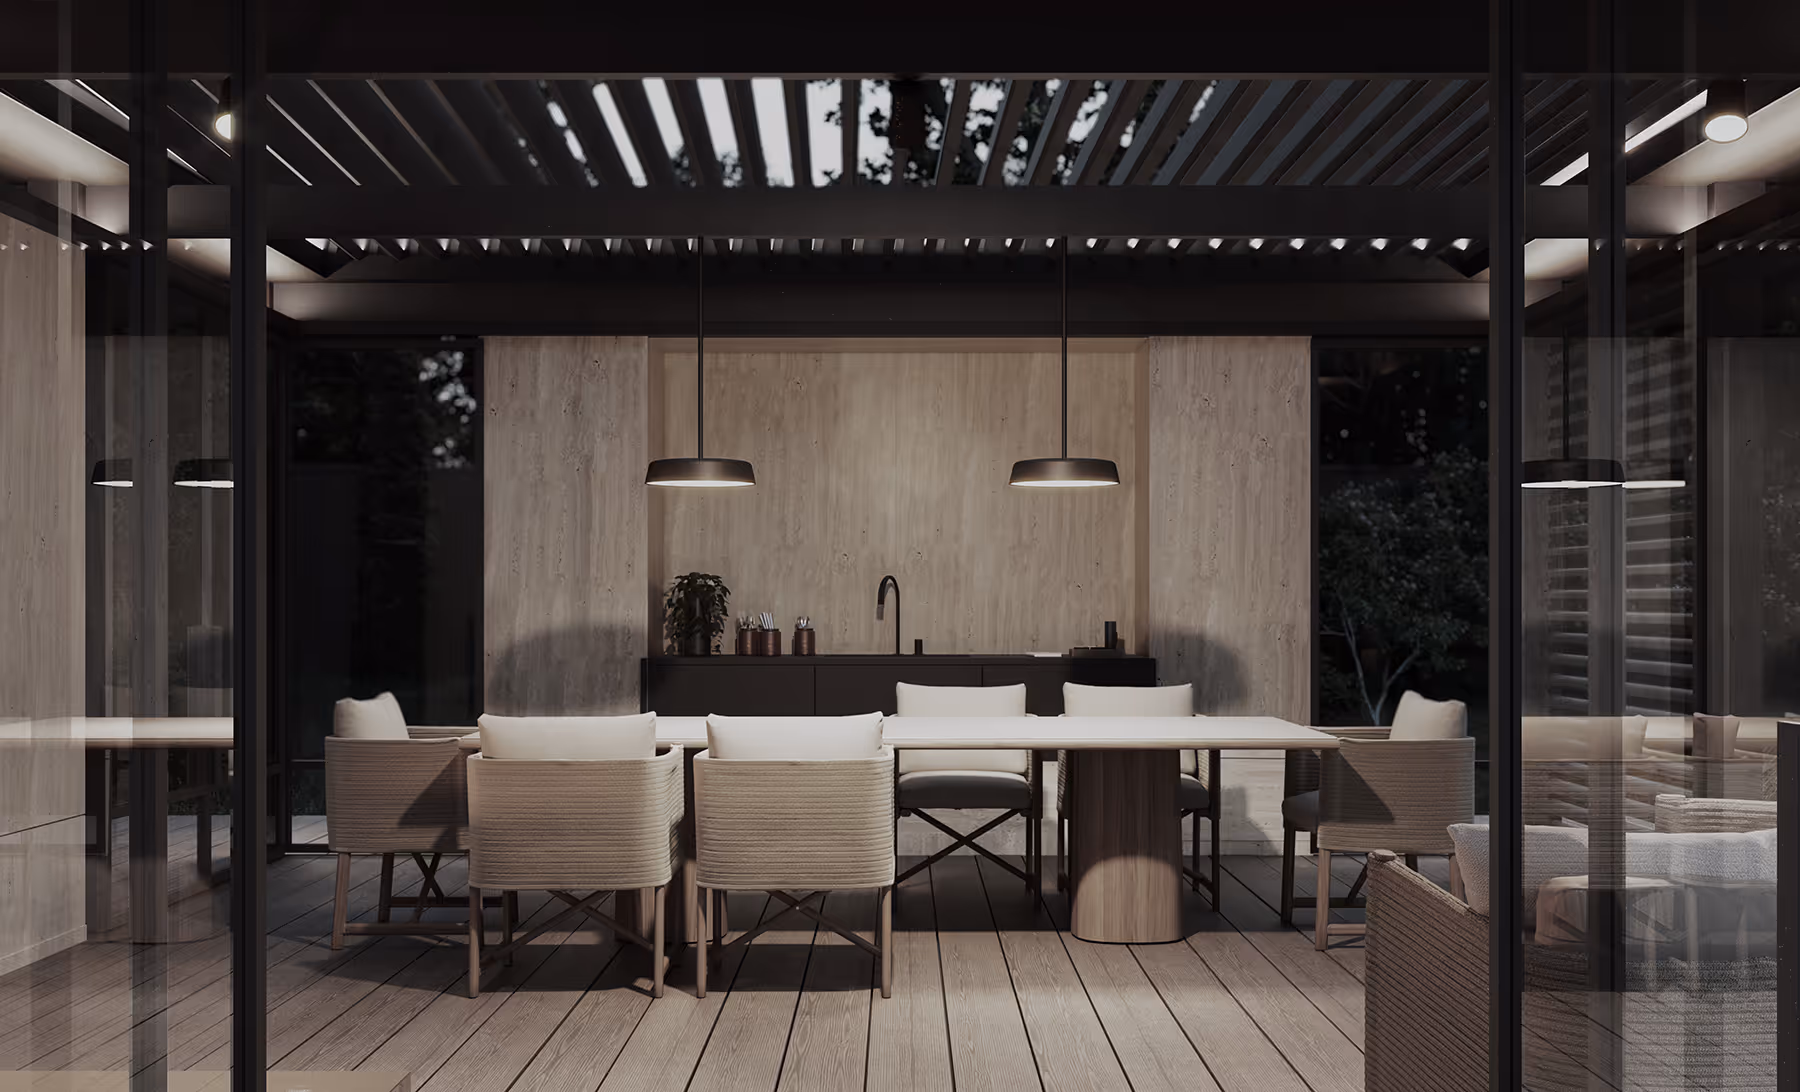
Modern slat pergolas use thin, closely or evenly spaced rafters — often in dark powder-coated aluminum or crisp painted wood — for a flat-topped, architectural look. They suit contemporary and mid-century homes, and the tight slat spacing gives you more controllable shade than a traditional widely-spaced timber top. Pair them with smooth, contemporary deck boards and a monochrome or tonal palette.
Heavy-timber pergolas — chunky cedar or pressure-treated posts and beams, often with decorative rafter tails — are the traditional choice and still the most popular. They read warm and substantial and suit craftsman, farmhouse, and transitional homes. The wider rafter spacing throws bold striped shadows but blocks less midday sun, so orientation matters more here. And remember those chunky beams catch and hold drifting snow, so the footings and post sizing underneath them have real work to do in an Ontario or Quebec winter.
Steel-and-cable pergolas use slim steel posts and beams with tensioned cable or thin rod rafters overhead. They're the most transparent option — minimal visual bulk, maximum view — and pair naturally with cable deck railings for an unbroken, modern-industrial sightline. Best for decks with a view worth protecting and homes with a contemporary or loft aesthetic. On an exposed Prairie lot, that slim profile is also a wind story: less to catch a gust, but the posts still have to be anchored and braced for a Calgary blow.
Louvered (or "bioclimatic") pergolas have motorized or manual rotating roof slats. Open them for full sun and dappled shade; close them for near-solid cover that sheds a sudden rainstorm. They're the most expensive category and need power and proper drainage, but they're the only true open-air pergola that converts to a rain roof on demand — a real advantage in a climate where a Vancouver afternoon shower or a sudden Prairie thunderstorm is always possible. One winter caveat we always raise: a closed louvered roof can hold a heavy snow load, so know the manufacturer's rated capacity and whether yours should be left open through a Canadian winter.
A vine-covered pergola trades engineered slats for living shade — climbing plants grow up the posts and across the top to form a green canopy. It's the most romantic and the coolest underfoot in summer, but it's also the dampest and messiest overhead: leaves drop, the canopy drips long after rain stops, and the deck below stays shaded and humid for much of the day. This is the group where the board you put down matters most. When a customer tells us they're training a wisteria over the seating, the first thing we talk about is what's going underneath it.
Stand on your finished deck the morning after a rain and watch where the sun reaches. Here's the part most pergola guides miss. The moment you put a structure overhead, you change the microclimate at deck level. Slats, a vine canopy, or closed louvres cut the direct sun that normally dries a deck within an hour of rain. Dew, snowmelt, and the drip that keeps falling from a wet canopy linger. Leaves and petals collect between boards. In effect, you've created a shadier, damper, slower-drying zone — and you've done it on purpose, because that's what makes the space comfortable. We see it most plainly on Halifax coastal decks, where salt-laden damp already hangs in the air and a pergola overhead just keeps that zone wet longer.
For wood and for wood-fibre composite (standard WPC, which contains ground wood as filler), that microclimate is the worst-case scenario. Persistent moisture is what feeds rot in timber and surface mould and mildew in wood-based composites; the wood fibre absorbs water, swells, and gives mould something organic to grow on. Shaded, north-facing, tree- or pergola-covered decks are exactly where homeowners report the most cupping, slickness, and green film — those are the boards we get the worried calls about.
This is where Tarimatec Ecofiber Stone Composite is genuinely better suited to the job, and it's the board we supply for exactly this reason. It's a distinct category from standard WPC: a mineral-rich composite of roughly 50% rice husk — an agricultural by-product — plus recycled ground mineral (calcite) bound in a PVC matrix. There's no structural wood fibre to soak up water and feed mould. The result is a board that:
We'll be straight about the comparison, because we'd rather you trust the rest of the guide. Premium wood-fibre composites from the big North American brands are good products and have decades of field history in Canada; cedar, properly maintained, is beautiful. But for the specific conditions under a pergola — more shade, more trapped moisture, more organic debris — a mineral stone composite with no wood filler is the lower-risk surface. Tarimatec is European-engineered, made in Spain by Plásticos Viters S.A. (a manufacturer with 70-plus years in the material), selected for Canadian weather, and distributed exclusively in Canada by Zinodeck — not made in Canada, and we won't pretend otherwise. It carries a 25-year warranty, a verified Environmental Product Declaration (EPD-IES-0007588:002, valid to 2027-12-02), ISO 9001 and ISO 14001 certification, and is 100% recyclable — credentials that matter on spec'd and commercial projects as much as on a backyard.
Treat the deck and the pergola as one palette, not two purchases — it's the advice we give first when someone sends us a photo of their planned frame. Tarimatec's 31 colours span three collections — Chromatic (bold, modern tones), Wood (natural wood-tones), and Ethnic (textured, stone-look) — across Nature, Tecno, and Surco finishes, which gives you room to either match or deliberately contrast. A few reliable pairings:
You can order samples online to test colours against your house and your planned pergola material before you commit to full boards. Full boards are quote-direct, and you can order Tarimatec colour samples to make the call in real daylight — which is the only place a colour ever tells the truth.
Your first real fork in the road is whether the pergola leans on your house or stands on its own. It changes the look, the cost, the permitting, and the engineering. An attached pergola ties to the house with a ledger board bolted to the wall carrying one side; a freestanding one stands free on its own four-or-more posts. We see this decision play out differently across the country — a downtown Toronto deck off the back wall almost always goes attached, while a mid-yard Calgary lounge or a poolside platform usually has to stand on its own and brace itself against the wind.
| Factor | Attached pergola | Freestanding pergola |
|---|---|---|
| Posts required | Typically 2 (house carries the back) | 4 or more (self-supporting) |
| Cost | Lower (fewer posts and footings) | Higher (more posts, footings, bracing) |
| Best for | Extending an outdoor room off the house; smaller decks | Detached lounge zones, mid-yard or poolside decks, rooftops |
| Wall interface | Ledger must be flashed and sealed to avoid water intrusion into the wall | No wall penetration; no flashing risk |
| Rigidity | House provides lateral stability | Needs knee braces or a moment connection to resist sway and wind |
| Snow load path | Shares load with the house structure | Carried entirely by its own posts and footings |
| Permit complexity | Often higher — attaching to the dwelling triggers more scrutiny | Sometimes simpler if under a size threshold, but varies by municipality |
The most common mistake on attached pergolas is a poorly flashed ledger. Where the pergola ledger bolts to the house, water must be kept out of the wall assembly with proper flashing and sealing — the same discipline a deck ledger demands. On freestanding structures, the priority shifts to lateral bracing: without the house to lean on, the frame needs knee braces or engineered connections so it doesn't rack in wind. On an open Prairie lot where the wind has a long run at it, that bracing isn't optional — it's the difference between a frame that stays square and one that's leaning by its second autumn.
Think about when you actually use your deck, and which sun makes you get up and move. A pergola only shades well if its slats are oriented for the sun you actually want to block. In Canada, the sun tracks across the southern sky and sits lower than in equatorial regions, so the geometry is specific. We hear the same complaint over and over from south- and west-facing Toronto decks: by five on a July evening the surface is radiating heat and nobody can sit out there — that's the sun a pergola has to be aimed at.
Slat depth and spacing are the levers: deeper rafters set closer together cast more shade as the sun moves off vertical. If you want predictable, dial-in shade rather than a fixed compromise, a louvered/adjustable pergola earns its higher cost. And remember the microclimate point — wherever you create the deepest, most persistent shade is exactly where you most want a moisture- and mould-resistant board underfoot, which is the board we'd steer you toward for that zone.
If you want to use this deck past dusk — and in Vancouver's rainy season or a Maritime fall, dusk comes early — the overhead structure is what makes that possible. It's what carries the light and the heat that stretch a deck into the cool shoulder seasons. Plan the electrical before the pergola is built, not after.
For anything beyond plug-in string lights, run the wiring in conduit and have a licensed electrician handle permitted exterior circuits — most Canadian municipalities require an electrical permit and inspection for new outdoor wiring.
If you've been pulling inspiration from Pinterest, brace yourself — this is where a deck-and-pergola project in Canada diverges sharply from the sun-belt galleries you've been saving. Three realities drive the engineering and the paperwork, and they're the ones we spend the most time on with customers staring down a real winter.
An open-slat pergola sheds most snow, but it is not load-free. Snow drifts onto rafters, and a closed louvered roof can hold a substantial snow load until you open or clear it. The structure — posts, beams, and connections — must be sized for the ground snow load and wind in your area, which the National Building Code and your provincial/municipal code define by location and which vary enormously across the country. A pergola engineered for mild coastal Vancouver is dangerously undersized for the snow that piles onto a Muskoka cottage or a Quebec City backyard. Have the beam spans and post sizing checked against local snow and wind loads, and on louvered systems, know the manufacturer's rated snow capacity and winter procedure (many should be left open or cleared).
This is the one homeowners most often get wrong, and the one we wish more inspiration galleries mentioned. Pergola posts can't sit on surface blocks or shallow pads in most of Canada — seasonal freeze-thaw heaves anything above the frost line, which will rack and crack the structure over a winter or two. Footings generally must bear below the local frost depth, which ranges from roughly 1.2 m in milder southern areas to 1.5 m or more in colder regions (confirm the exact figure with your municipality). In practice that usually means concrete footings or screw piles taken below frost, with proper post anchors. A freestanding pergola carries its entire load on these footings, so they aren't optional — they're the difference between a structure that stays plumb for decades and one that moves every spring. And if those posts land on a composite deck, anchor them to the framing below, never to the boards themselves.
Most Canadian municipalities require a building permit for a permanent pergola, and an attached pergola almost always does because it connects to the dwelling. Freestanding structures may fall under a size or height exemption in some municipalities and over it in others — there is no national rule, so the only reliable step is to check with your local building department before you build. Expect them to want to see footing depth, structural sizing for snow and wind, setbacks from property lines, and — if you're adding wiring — a separate electrical permit. Building the deck and pergola without required permits can stall a future home sale and force costly retroactive inspection.
Plan the footings and the permit first, the pretty slats second. A pergola that's the wrong style is a regret; a pergola on frost-heaving footings or built without a permit is a liability.
Once you've settled the style and the build envelope, the budget question is the next thing you'll want answered. Costs vary widely by size, materials, and region, but rough 2026 Canadian ballparks for the pergola alone (structure only, not the deck) are:
The deck surface is a separate line item, and the board you choose for the shaded, damp zone under a pergola is where it pays to spend for durability rather than save on a material that will cup or mould in those conditions — we've seen which call people regret. To put real numbers against your own square footage and board choice, use the Zinodeck CAD cost calculator, and for the sustainability documentation that matters on commercial and spec'd projects, see the EPD and sustainability credentials behind the material we supply. If you're a builder, contractor, or designer specifying decks with pergolas, the Zinodeck trade and dealer program covers project pricing and spec support.
If you're starting from a blank deck or a blank yard, this is the order we'd talk you through — and it keeps the project from going sideways:
Get those six in order and the 25 ideas above stop being a gallery and become a buildable, durable outdoor room. For more on choosing the surface itself — the half we know best — compare your options in our guide to the best Trex alternatives in Canada.
Usually, yes. Most Canadian municipalities require a building permit for a permanent pergola, and an attached pergola almost always does because it connects to the house. Some freestanding pergolas fall under a size or height exemption, but the rules are set locally and vary widely — always confirm with your municipal building department, and budget for a separate electrical permit if you're adding lighting or heating.
A pergola keeps the deck below it shadier and damper, which is hard on wood and on wood-fibre composite because persistent moisture feeds rot and mould. A mineral stone composite like Tarimatec Ecofiber — made with rice husk and recycled mineral instead of wood filler — is better suited because it resists moisture, mould, warping, and UV fade in exactly those conditions, while staying cooler underfoot in the sunny gaps between slats.
Attached pergolas use fewer posts and cost less, and suit outdoor rooms right off the house — but the ledger must be carefully flashed to keep water out of the wall. Freestanding pergolas need four or more posts and lateral bracing but avoid any wall penetration and work better for mid-yard, poolside, or rooftop decks. Your spot, budget, and local permitting usually decide it.
In most of Canada, pergola footings must bear below the local frost line so seasonal freeze-thaw doesn't heave and rack the structure. Frost depth ranges from roughly 1.2 m in milder southern areas to 1.5 m or more in colder regions. Confirm the exact requirement with your municipality, and use concrete footings or screw piles with proper post anchors rather than surface blocks.
Orient the rafters to block the sun you most want gone. For hot late-afternoon west sun — the usual complaint — run rafters north-to-south so their depth blocks the low western rays, or add a screen on the west side. Deeper, more closely spaced slats cast more shade as the sun moves; a louvered/adjustable pergola lets you dial shade in precisely.
Yes — a pergola is the ideal structure for it. String or festoon lights, recessed beam downlights, post-cap and stair lights, a damp-rated ceiling fan, and beam-mounted infrared heaters are all common. Mount everything to the structure rather than the decking, respect heater clearances to wood rafters and vines, and have a licensed electrician handle any permitted exterior wiring on a GFCI circuit.
{"@context":"https://schema.org","@type":"FAQPage","mainEntity":[{"@type":"Question","name":"Do you need a permit to build a pergola on a deck in Canada?","acceptedAnswer":{"@type":"Answer","text":"Usually, yes. Most Canadian municipalities require a building permit for a permanent pergola, and an attached pergola almost always does because it connects to the house. Some freestanding pergolas fall under a size or height exemption, but the rules are set locally and vary widely - always confirm with your municipal building department, and budget for a separate electrical permit if you're adding lighting or heating."}},{"@type":"Question","name":"What is the best decking material to use under a pergola?","acceptedAnswer":{"@type":"Answer","text":"A pergola keeps the deck below it shadier and damper, which is hard on wood and on wood-fibre composite because persistent moisture feeds rot and mould. A mineral stone composite like Tarimatec Ecofiber - made with rice husk and recycled mineral instead of wood filler - is better suited because it resists moisture, mould, warping, and UV fade in exactly those conditions, while staying cooler underfoot in the sunny gaps between slats."}},{"@type":"Question","name":"Should a pergola be attached to the house or freestanding?","acceptedAnswer":{"@type":"Answer","text":"Attached pergolas use fewer posts and cost less, and suit outdoor rooms right off the house - but the ledger must be carefully flashed to keep water out of the wall. Freestanding pergolas need four or more posts and lateral bracing but avoid any wall penetration and work better for mid-yard, poolside, or rooftop decks. Your spot, budget, and local permitting usually decide it."}},{"@type":"Question","name":"How deep do pergola footings need to be in Canada?","acceptedAnswer":{"@type":"Answer","text":"In most of Canada, pergola footings must bear below the local frost line so seasonal freeze-thaw doesn't heave and rack the structure. Frost depth ranges from roughly 1.2 m in milder southern areas to 1.5 m or more in colder regions. Confirm the exact requirement with your municipality, and use concrete footings or screw piles with proper post anchors rather than surface blocks."}},{"@type":"Question","name":"Which way should a pergola face for the most shade?","acceptedAnswer":{"@type":"Answer","text":"Orient the rafters to block the sun you most want gone. For hot late-afternoon west sun - the usual complaint - run rafters north-to-south so their depth blocks the low western rays, or add a screen on the west side. Deeper, more closely spaced slats cast more shade as the sun moves; a louvered or adjustable pergola lets you dial shade in precisely."}},{"@type":"Question","name":"Can I add lights and a heater to a pergola?","acceptedAnswer":{"@type":"Answer","text":"Yes - a pergola is the ideal structure for it. String or festoon lights, recessed beam downlights, post-cap and stair lights, a damp-rated ceiling fan, and beam-mounted infrared heaters are all common. Mount everything to the structure rather than the decking, respect heater clearances to wood rafters and vines, and have a licensed electrician handle any permitted exterior wiring on a GFCI circuit."}}]}